TL;DR
The lights on the older Apple Xserve Server line won’t work if you install anything newer than 10.7 on them. Using a program that connects to the lights USB controller you can restore their function. It isn’t quite as good as HWmond was, but it does pretty well. If you are using Macports ( highly recommended ) just run the following:
sudo port install xserve-frontpanel
If you would like it to auto load when the machine boots up after you install it issue the following command:
sudo port load xserve-frontpanel
If you prefer to install xserve-frontpanel without Macports or compile it from source keep reading…
Installing From Source
The easiest way to install is with Macports as described above. That said if you prefer to install from source or do not want to use Macports the following will achieve the same ultimate end goal of getting the lights working again.
To install from source or setup Xserve-frontpanel manually you are going to need to install Libusb as well as download the source code for xserve-frontpanel from GitHub, https://github.com/castvoid/xserve-frontpanel.
Before you could install it with Macports I setup my Xserves to have the Xserve-frontpanel code in a folder at root and then symbolic links to put things where I wanted them while still keeping all the related files in one main directory. I also created a plist ( https://github.com/castvoid/xserve-frontpanel/pull/6 ) to load into launchd that would start the hwmond ( process that runs the CPU lights ) when the machine would boot.
Install Libusb
Unless already installed on your system you will need to start by using Macports, Homebrew or compiling source to install libusb.
Compile Source
Once you have installed libusb go back to the directory you have the xserve-frontpanel source in and issue the following command:
cmake . && make
Libusb not found
If when you tried to compile you got a libusb not found type error chances are that it just doesn’t know where to find it. To fix this you will need to either change where you installed it to or point the xserve-frontpanel script to the libusb-1.0.0.dylib file.
A symbolic link allows you to keep the files where they are and put a link back to them in another folder. In this case do the following to create the Symbolic link. First start by creating the following directory structure /usr/local/opt/libusb/lib you can do this with finder if it is easier for you. First since /usr/ should already exist, but is hidden go to the top menu to Go->”Go To Folder” and then put in /usr/ now you check if there is a “local” folder and create if not. Then go in and do that again for opt, libusb, and finally lib.
Then go back to the terminal to create the symlink which will put a link to libusb-1.0.0.dylib in that directory. The way you make symlink is “ln -s /path/to/original /path/to/link” terminal command and they get treated by the OS as though it was the actual file.
sudo ln -s /REPLACE-WITH-PATH-TO-FILE/libusb-1.0.0.dylib /usr/local/opt/libusb/lib/libusb-1.0.0.dylib
Now that you have created your symbolic link you can try to compile the source code again hopefully this time resulting in the HWmond file being created.
Quick side note here I have used Symlinks to solve TONS of problem I encountered with OS X and stuff being in the wrong or unexpected place. It is a good thing to have in your back pocket for later as is really more a reference back to the file itself than a shortcut to it.
Initial Testing
With the newly created HWmond file you will want to test to make sure the CPU lights work as expected. To do this go back to the folder you have the compiled HWmond file in and drag it to the terminal. That should put the path to the file in terminal. Now hit enter and it should run. IF NOT that is ok, since you ran it in the terminal you should get an error. Alternatively if you can’t get it to work that you should be able to double click or drag it onto of the terminal icon.
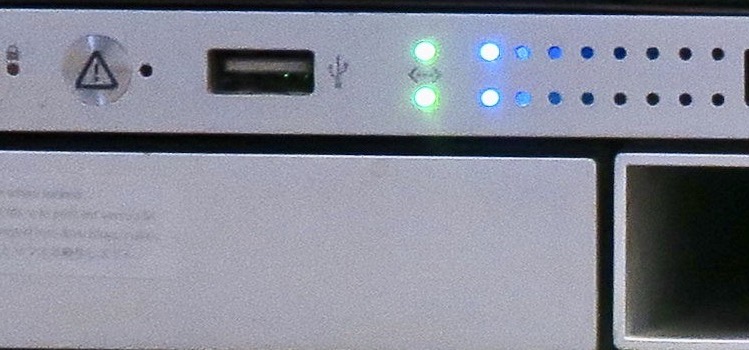
You will know it worked if you see the far left two lights dimly lit ( assuming no load ). If that works you do did it! You just need to exit the terminal ( the lights will most likely be stuck how they were when you quit. This is because the last command it sent was to set the lights to that level and it just doing what it was last told ).
Auto loading at boot with Launchd
Ok so now it works let make it work all the time at boot. If you haven’t already go download the plist from GitHub, https://github.com/castvoid/xserve-frontpanel/pull/6. Once you have downloaded it, move it to the directory where you have all the other files. Then change the permission using the following terminal command:
chmod 644 com.xserve-frontpanel.daemon.plist
Rather than moving the plist to the Launch Daemons folder it is easier to leave it where it is and once again use a symbolic link. Use the following terminal command to create it.
sudo ln -s /REPLACE-WITH-PATH-TO-FILE/com.xserve-frontpanel.daemon.plist /Library/LaunchDaemons/com.xserve-frontpanel.daemon.plist
Ok last step! Now we just need to tell Launchd ( the process that loads and keeps stuff running ) that we want this run on load.
sudo launchctl load -w /Library/LaunchDaemons/com.xserve-frontpanel.daemon.plist
The “-w” part of the last command tells the computer this thing has to ALWAYS run. So even if you kill the HWmond program Launchd will start it back up automatically. It basically guarantees that the lights will always work after you finish these steps just like before.
Final Testing
OK time to test what we did by restarting the Xserve. The CPU lights will flash as they always do since that is part of the internal hardware test, however now when the login screen comes up you should see far left 2 lights for the CPU status light up. To truly test login and try doing something CPU intensive and make sure the light bars show accordingly.